Mount Chocorua

When I was a kid, I fell in love with the book “Look to the Mountain” about settlers in Middle New Hampshire. The Mountain in the title is Chocorua. This weekend I got to meet her in person; on May 3rd my son and I hiked up Mount Chororua.

This was my favorite New Hampshire hike thus far. Highlights include a River crossing, a Bald Eagle sighting, a fun boulder problem in a stellar setting, and 360 degree views of the White Mountains from the summit on clear day. The last was made the more special by picking out the previous hikes. I think my hiking partner is starting to get an appreciation for geology and geography.

The Peak of Chocorua as seen from the trail.
Continue reading

Fear

Climbers on The Nose of El Capitan

“I don’t want to do it.  I wouldn’t enjoy it.”

I knew what he meant, probably better than he did himself.  I think I knew that this would happen, or at least strongly suspected.  I knew when we were so slow leaving the city.  I knew from the way he had withdrawn into his cell phone, texting with his wife.

Continue reading

Deadpoint

When you throw something straight up in the air, there is a point where it has no movement at all. Before this point, it is rising, after this point it is falling. But for an instant, it is floating. This is the deadpoint.

Thanks, Randall!

(Courtesy of Randall Munroe)

When climbing, you want your body at the deadpoint when grabbing a climbing hold. If you grab before the deadpoint, your own momentum will continue to carry you upward and off the hold. If you grab after the deadpoint, your downward momentum will put additional strain on your fingers, making it harder to hold on. If you grab exactly at the deadpoint, you will maximize your ability to hold on to small holds.

Basic Body Position for Rock Climbing

The first rule of climbing is to climb on straight arms.

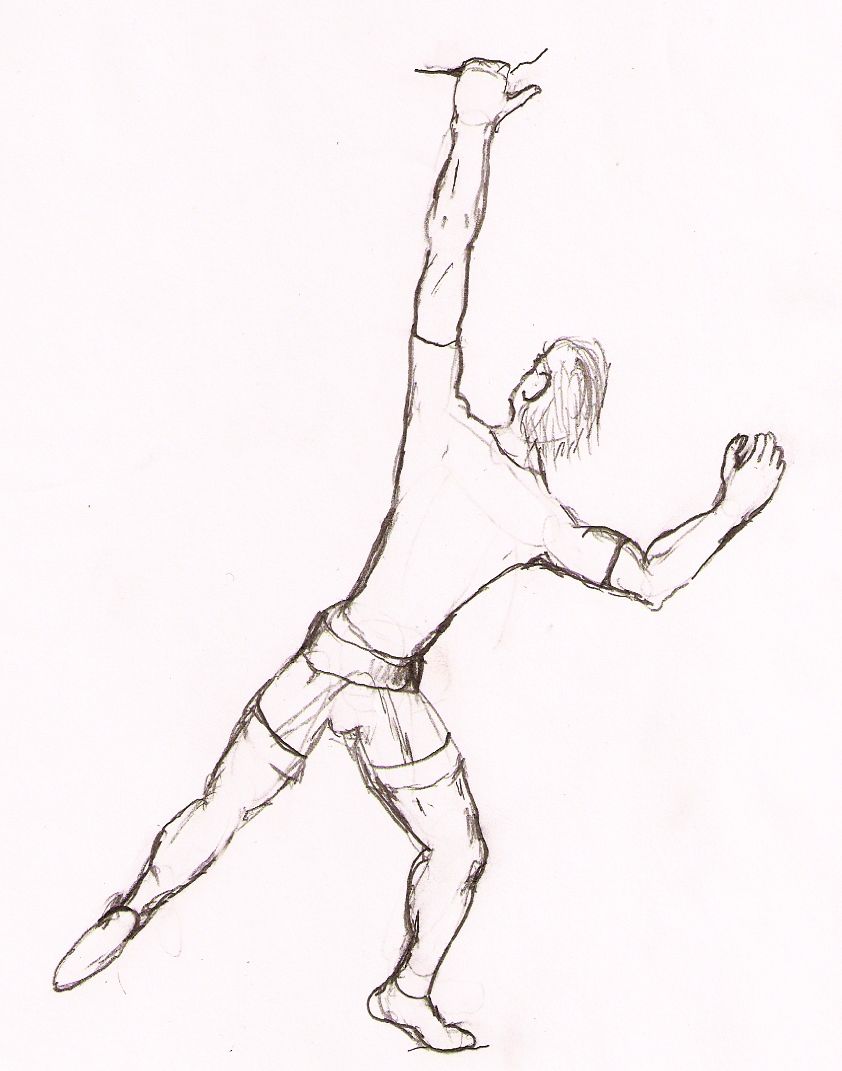
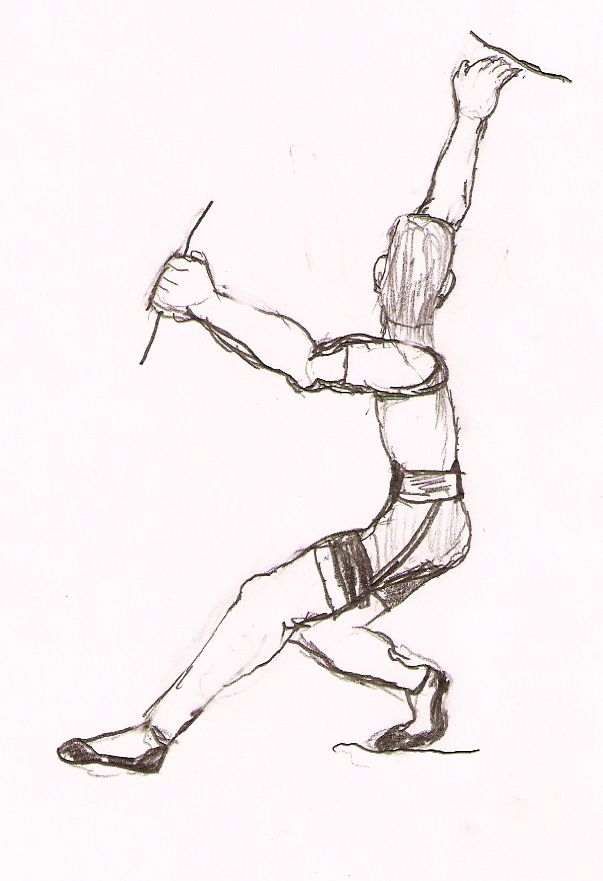
Compare these two pictures.

the_x.jpegbent_arms.jpeg

The climber in the first picture is supporting his weight on his skeleton. In both pictures, the climbers are actively using the muscles that keep the fingers curled, but the first climber is using only those muscles, the second climber is using far more. Aside from the obvious bicep and latissimus dorsai muscles, the bent arm position in the second picture shows a climber stressing out the muscles in the forearm. It is this mistake, spending too much time on bent arms, that is responsible for the pumped feeling a new climber gets after a few climbs. There is a tendon system that runs down your arm and connects to your back. when you climb on straight arms, you hang on this tendon system. It is a holdover from our monkey ancestors that swung through the trees. Remember crossing the monkey bars as a kid? You swung from straight arm to straight arm. When you climb up, you want to use straight arms, too.

Try this simple experiment:

Hold a book by the two fingers, one at the top of the binding, one at the bottom. If you hold the spine perfectly vertical, the pages splay out. If you tilt the book so the the top is no longer over the bottom, the whole book will rotate so the open pages are all pointed straight at the ground.

In geometry, we learn that a triangle is defined by three points, and that a plane is also defined by three points. We can make a triangle out of our book example with one point on the top of the spine, one on the bottom of the spine, and one in the center of gravity. What we see is that the plane defined by these three points will always rotate itself to align perpendicular to the ground. The two fixed points act like the hinges on a poorly hung door. The door will always swing to point toward the center of the earth.

This holds true for climbing. The simplest example is a climber holding on with both hands and no feet. The climber naturally dangles toward the ground. For people, the center of balance is typically the abdomen. Thus the triangle is formed by the two hands and the navel.

.the_triangle.png

In order to move smoothly, you are going to be holding on to the wall with only two points of contacts much of the time. In order to it is far more important that you align the triangle of you body with the ground. If you don’t you will be fighting your bodies tendency to rotate. One way that climbers do this is to only move one limb at a time while keeping three in contact with the wall. This limits your options significantly. The other way is to try and overuse the muscles of the forearm to battle the rotation, causing premature flame-out.

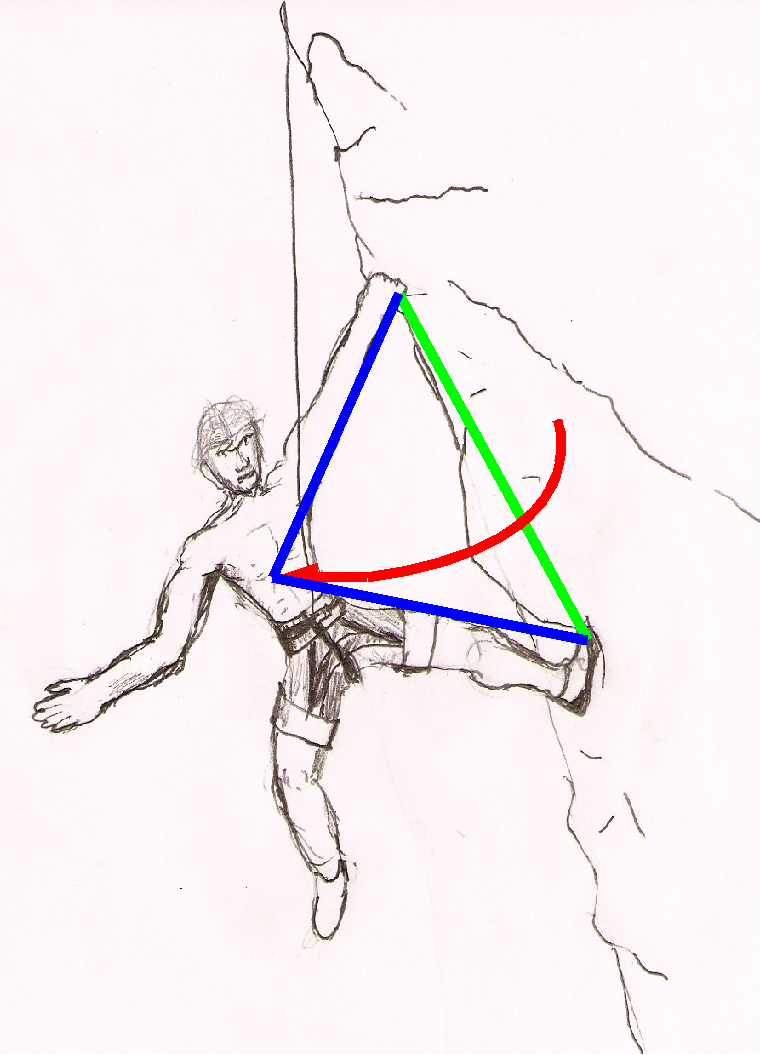
The longest line of the body if from hand to opposite side foot. This follows either the red or green line of the body. Note that where these two lines cross is near the center of balance.

the_x.png

Let’s put together these items. The longest line of the body is from one foot to the opposite side hand, and this line crosses through the center of balance. We want to keep the center of balance in line with the contact points on the wall. This leads to body positions similar to the one displayed below.

in_line.jpeg

First and foremost, the climber is holding on with a straight left arm. This climbers body is in line from left hand, through abdomen, to right foot. His left foot and right arm counter balance each other to keep his body in line. If he finds his center of balance is off, he can adjust either limb to bring it back aligned. If he moves is right hand in or out along the dotted red line, his center of balance will adjust in or out parallel to that line. Additionally, he can move his hand in a circle and adjust his center of balance accordingly as well.

in_line_hand_adjust.png

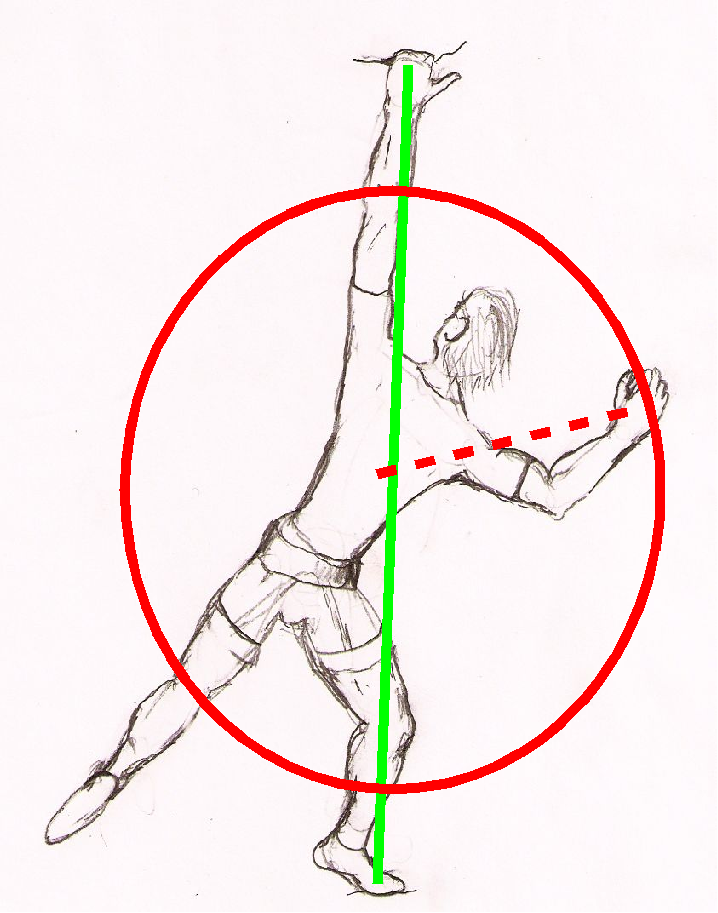
His left leg follows the same rules. If he extends it out along the red dotted line,it pulls his center of gravity out along it. If he lowers his leg along the circle, he pulls his center of gravity in toward his body.

in_line_foot_adjust.png

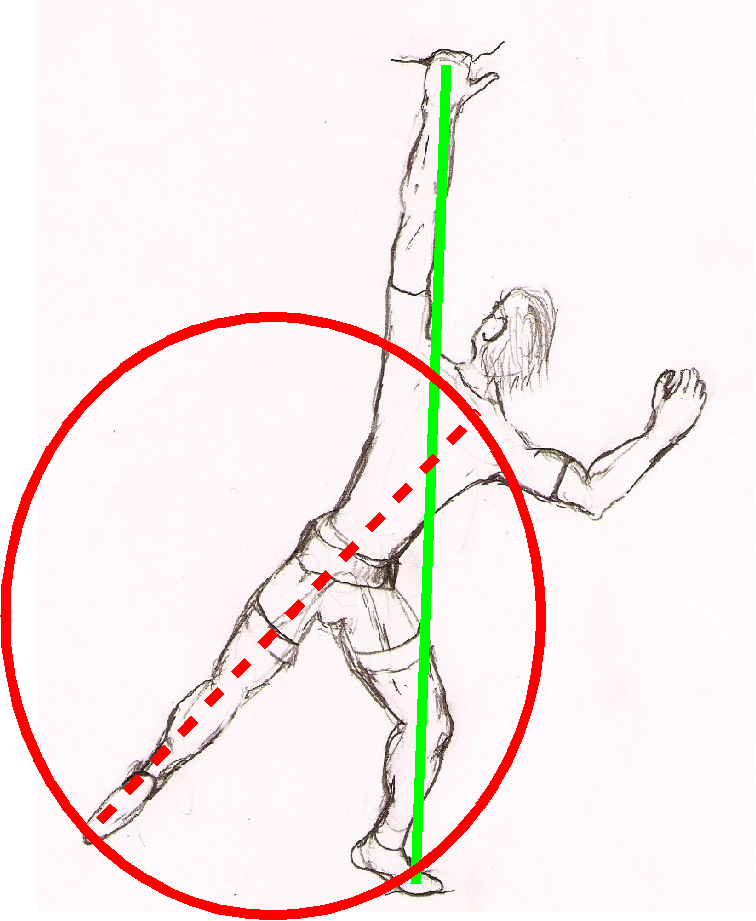
The general pattern in climbing, especially in the gym, it reach up with the inside arm, and then to pivot so that arm becomes the outside arm. When you reach up with your left hand, you left hip will be pressed against the wall. Once you have that hold, you will pivot so that your right hand is against the wall. The climber in the picture above could well end up in a position similar to this:

right_side_against_wall.jpeg

The climber is leaning back against the side pull held by the left hand. He flags his left foot to provide a counter balance. This moves his center of gravity toward the line between his right foot and his left hand. If he continues to torque around on this axis, he can push with his toe against the wall to provide a counter force. Once he grabs the hold with his right, he is likely to step through so his left hip is against the wall, standing on the outside of the left foot. This pattern of alternating the hip against the wall while reaching with the inside arm is a motion similar to swimming or salsa dancing.

Contrast this with an attempt to use both limbs on the same side of the body. When the climber lets go with the right hand, and unloads the right foot, gravity pivots his body around the axis of the two remaining points of contact and the climber ends swinging out from the wall, a movement called “Barn Dooring”

barn_door.png

Here the green line shows the axis of the pivot, and the red arrow the movement of the swing.

Back to Cannon

If you plan on climbing at Cannon cliff, try to find a climb other than Moby Grape.

When you exit the parking lot at the base of Cannon Cliff, you will see a box on right hand side where you are expected to leave a record of your party, your vehicle, and your planned climb. Before I placed my sheet in the slot, I scanned through the 7 or so sheets from parties ahead of us. Two were planning on climbing Whitney-Gilman, one had listed a couple difficult climbs, and four were planning on climbing Moby Grape.

The path to the cliff was different than I remembered from my last trip, back in 1993. After walking up and down the path a few times, looking for the cairn that was no longer there, I finally pulled out the guide book to see that we were supposed to hook a hard right on a small path right after the bridge. The hike up to the cliff comes up just to the right of the former site of the “Old Man of the Mountains.” The fog line was right at the base of the cliff, preventing us from really identifying any features on the cliff. Still, I knew that we were to the right of the start of Moby. So we walked left along the base of the cliff.

Cannon really is a tremendous piece of granite. The frost action is brutal there, ;leading to lots of rock fall each year. That means that it has a lot of interesting features. Walking past many of the other climbs, you could see multiple lines up, corners, roofs, cracks, and aretes.

The first pitch of Moby Grape has been replaced by a better start, a single pitch climb. Reppy’s crack is a 5.8 hand crack that would feel right at home in Yosemite. When we arrived, there was a party on the climb, with the second just visible at the top of the crack, and another party all ready to go. We took our time getting prepped, as we would have to wait for both the leader and the second, but we were in no rush. Even though the climb is 8 pitches, only a couple go at 5.8 and most are easier. I did realize that I had forgotten my headlamp, and Pete admitted that he didn’t have his either. The leader of the party just starting the climb was a new leader, and had gotten scared recently, and did not know how to crack climb. He made about five feet of vertical progress in twenty minutes. We decided to move to a different climb. We decided not to do the original start of Moby as it took larger gear than we had brought, and the crowds up higher were likely to be as bad as we had there on the ground. Instead, we moved over to Vertigo, a 5.9 a few hundred feet back toward the trail.

Actually, the first pitch was not Vertigo at all, but instead the first pitch of Union Jack. It was a clean, straight ahead 5.6 and Pete lead it with no trouble at all, setting up anchor a a pair of brand new bolts that would make the ASCA proud. The second pitch went at 5.8 and was mine. The first part was quite straight forward, interesting enough with a combo of crack and layback ending at a bolt. Yep, a bolt on Cannon. The bolt was there to let you lower out, and pendulum around the corner. I’ve done a little bit of aid climbing, and cheated on my share of climbs, but I don’t recall having to do a pendulum, and certainly not one as tricky as this. I had a goldlocks moment there: My first attempt was too high, my second was too low. My third was too high. But my fourth attempt was just right. I managed to grovel across the slab to the finger crack about 20 feet to my right and get up into the second part of the pitch. Due to the way the rope was running from the bolt, I had to run it out a bit before I could place another piece, but the crack was stellar, probably 5.7 climbing. I got stumped right before the anchor, and ended up hang-dogging the last move. It was a fairly physical sequence, and I was feeling pumped.  The two climbers ahead of use were rappelling down, and I ended up hanging out at the anchor with one of them.  Between their tale of the offwidth and the fact that I was freezing made me decided I did not want to complete the climb.  IT was Only 5.9, but I am pretty out of shape, my partner wasn’t going to lead it, and I was close to fried.

Instead, we rappelled one long 200′ rap to the ground and moved over to Slow and Easy.  This is a 5.8 crack on the left edge of the big wall area.  Pete gave it a quick attempt, but was shut down by the unfamiliar climbing style.  I gave it a go, and, although challenged by it, lead it clean.  I love crack climbing, in case you were wondering.

On the hike out, we walked down directly beneath the former site of the old man.  I turned and looked up ward and saw, silhouetted against the sky two cables.  They looked like  wipers that had been left up while someone cleaned the windshield.  I wondered which of the boulders we scrambled across had been part of New Hampshire’s icon.

Trad climbing…at Rumney

Yes, Rumney. That bastion of sport climbyness, where even the cracks are bolted. Why, you may ask, did I want to trad climb at Rumney? The short answer was, I didn’t. I wanted to trad climb, and my partners were going to Rumney.

For the non climbers reading, trad is short for traditional climbing. Both sport and trad climbing are terms to describe the type of protection the first person in a climbing party, or leader, has to use in order to keep from hitting the ground if they fall. The gear used in traditional style of climbing is designed to be placed and removed by hand. Thus traditional climbs require some weakness in the rock, some crack into which the climber can place a chockstone or a spring loaded camming device. Sport climbing is where the leader clips into bolts with hangers that have been drilled into the wall. Rumney is the prime sport climbing location in New Hampshire. So why would I decide to trad climb there?

Because the protection is easier to place in sport climbing, people sport climb at a higher level than they do trad climbing. The difference comes from the amount of time spent placing gear. In a sport climb, you get within reach of the bolt, you grab a “quick-draw” (two carabiners connected by webbing) off of a gear loop on your harness, clip on ‘biner to the bolt hanger, the other to the rope, and you move on. Contrast this with trad climbing where the first thing you do is decide that you need to place a piece of gear. You examine the rock in your immediate vicinity and decide that there is somewhere possible to place a piece. You select something from a wide array of gear slung around your neck that experience tells you is most likely to fit in the crack in the rock. You slot it in, adjusting how it sets against the side of the crack to best support your weight in a fall. You yank down on it, to tess that it will hold at least that much weight. Then you yank outwards; if you climb up[ past the piece the rope will most likely put a horizontal load on the piece. Once you feel comfortable with the piece, you may decide to extend it (due to the wandering nature of the route you are climbing) with a quick draw. Then you clip it to the rope. If done cleanly, this will take at a minimum a few seconds more than the sport clip. Often, there is additional delays perhaps due to selecting the wrong piece of gear. A climb with the same difficulty rating is significantly harder to trad climb than to sport climb.

I think it is that extra degree of knowledge required to trad climb safely that calls to me. There are better climbers in all aspects of the sport. I will never compete with Chris Sharma, Ron Kauk, John Long, or any of the other rock demigods in any aspect of rock climbing. I am OK with that. If climbing were so important to me, I wouldn’t spend my time in front of a computer programming for a living. When I do get the time to get outside and climb, I like the experience of trad climbing. I prefer choosing where to place gear myself. Ideally, I love long, multi-pitch routes, with great views and few people. It is something like hiking, but a full body experience.

It is funny: I know that bolts are safer. The standard climbing bolt can carry the weight of a car, never-mind the forces generated by a climber in a fall. But I prefer something that I have placed myself. I get a greater piece of mind from something based on my own judgment, placed where I wanted it. Not that every placement I’ve made has been stellar. I’ve moved up above a piece (usually a passive placement) and heard the tink-tink sound of the carabiner hitting the rock as it slides down the rope. But those are infrequent. I’ve taken 25 foot falls onto several of my trad placements. I’ve never had a cam placement that I though was solid pull on me. It is all a question of judgment. I don’t get myself into a situation that I don’t feel I can safely navigate.

I hadn’t been to Rumney since 1992. If Rumney had a sports climbing only reputation back then I hadn’t heard about it. Mike Peloquin, Loren Armstrong, and I spent the day trad climbing at the main wall and had a grand ole time doing so. Thus, I had it in my head that Rumney was trad-climbable, even if its reputation said otherwise. Plus, one benefit to looking for trad routes at a sport climbing crag is that they are more likely to be available. Especially if one is visiting in the middle of the busiest weekend of the season. Once I linked up with my climbing partners, I flailed on a sport climb that would have been bread and butter for me in my prime. Not easy, but certainly within my ability. Due to crowding, we moved to another crag, as Rumney has a series of small cliffs with a dozen or so routes each. We ended up at Waimaia, the name of both the crag and the climb. Just to left of Waimaia the climb was “That Crack”. Needless to say it got my attention.

Climbs in America are rated on the Yosemite Decimal system. A leading number of 1-4 indicate various levels of non-technical climbing. A leading 5 means technical climbing. 5.0 is the easiest technical climbing on the scale.  The scale was originally designed to go from 0 to 9. Then people started blowing the top off the scale an it was extended to 10, with sub ratings of a,b,c, and d. Once someone climbed something harder than 1 5.10d, they extended the scale to 5.11. The pattern continued until today where the hardest climbs are rated 5.15a. The climb I was flailing on was 5.10d. That Crack was rated 5.10a. Easier, but not significantly so. With the difference between trad and sport, I was probably looking at a harder climb. One major thing in my advantage was that I could place gear where ever I wanted providing I had a piece that would fit in the crack. It was a short climb, and I have a fairly thorough rack, so I was confident in my ability.

The climb turned out to be a one move wonder. The bottom and the top were easier than the stated 5.10a. The guide book mentioned that “the chimney is a grovelfest” or something to that ends. A chimney in rock climbing is when you climb between two slabs of rock, using opposing pressure to hold yourself up.  This climb had about a ten foot section of chimney.  The funny thing about chimney climbing is that while most people curse about it, it is in some way the most secure type of climbing.  You are just not going to fall.  It might be really hard to make upward progress, and you may bruise your knees in the process, but there is something  snug and secure about chimney climbing.  That being said, I did not climb the chimney clean. Really, the problem was getting out of the chimney and back to facing the rock.  This is often the trick to chimney climbing, either getting into them or getting out of them.

Afterwards, I lead Waimaia and top roped That Crack again to clean it up.   Later in the day we climbed Darth Vader.  While it was a short route, it was enjoyable.  It was rated 5.9 and had a couple interesting moves at the top.  The route total for the day was 2 trad, 2 sport, 1 top rope.  I also lost and found my keys, wallet, and cell phone.  All in all a good day.

Foot placement in crack climbing

There are two main forms of rock climbing. The most popular is face climbing. The climber makes upward progress for the most by pulling downward on small ledges in the rock with their hands, and stepping on top of these same ledges with their feet. This is the predominant style of climb in climbing gyms as well as sport climbing. The other form of climbing involves cracks in the face of the rock. The techniques involved in navigating a vertical crack in a rock are somewhat different from the more popular face climbing.

I love crack climbing. A crack in the rock about two inches wide, just wide enough to get my hand inside, is thus called a hand crack. If a crack is in the face of a rock, with both sides of the crack flush, it is called a splitter crack. My ideal climb involves serious portions of perfect splitter hand crack.

A lot has been written about the placement of hands in hand crack. Less has been written about foot placement. Many people avoid crack climbing due to the painful nature of foot placement in cracks. I suspect I know the reason, and have a technique that will help both minimize the discomfort and maximize the effectiveness of foot placements.

The advice most people get when learning how to place feet is to cam the knee out perpendicular to the crack, so that the sole of the foot is vertical. You place the foot into the crack, and then turn the knee vertical, camming the foot inside the crack. The discomfort most people feet comes from the focus of pressure on the high point behind the big toe.

Contour Map of the Foot

The diagram above is a simplified contour map of the foot. The curved paths represent spots on the top of the foot that are all the same height. The line segment AB represent the edge of the crack when the foot is placed parallel to the ground and perpendicular to the crack. Note how this line goes right over the arch behind the big toe. This is the pain point.

Proper foot placement in crack climbing is based around lining up the contour of the foot with the edge of the crack. The line Segment CD represents the edge of the crack in the preferred approach. Note how it aligns more closely with the major contour that runs along the outside edge of the foot, behind where the toes join. A typical climbing shoe, especially one designed for crack climbing, will have sticky rubber well up to this point. This sticky rubber is much more evenly in contact with the sides of the crack.

Here’s the technique. Rotate the knee out to the side so your foot is vertical. Place your vertical sole in the crack. You should just feel the edge of the crack on the pain point. You are going to use the pain point as the pivot point as you rotate the heel of the foot downward while you straighten your leg. Your foot will cam naturally into the crack, and the pressure will be distributed along the contour line of the top of the foot. As you rotate your foot, straighten your leg as well, and you should be able to place body weight on the newly placed foot.

Dave Patterson’s photo shows Joe Dawson with his left leg in the described position. (Yes, that is Indian Creek, home of some of the greatest splitter cracks you can imagine.) Note that he has his fully body weight on the lower leg, minus the small bit that is loaded on his arms. Note: Dave is a friend.  I got explicit permission to use his photo.  Please do not take it and use elsewhere.

Photo Copyright Dave Patterson, Used With Permission

Photo Copyright Dave Patterson, Used With Permission

Peregrine Falcons at Russell Crag

Rock Climbing is my major leisure time activity. Given a free weekend, that is what I want to spend my time doing. One thing that excited me about moving back east was the quantity of good, climbable rock in the vicinity of my parents home in the White Mountains of New Hampshire. The house is about halfway between Rumney and Franconia Notch, two of the big three climbing areas in NH. The Third area, North Conway, is at the other end of the Kancamagus Highway. In addition to the numerous established climbing areas, there are vast numbers of smaller, local crags just begging to be climbed. One of these is on Russell Mountain, Just west of Russell Pond Campground, and just North of Exit 31.

Many years ago, after college I was suffering through from EMail. Before internet access was everywhere, most people had to resort to dial-up. I went with AOL. THis was before AL had developed its hard earned reputation for spam, script kiddies, and painful connections. When I was trying to get a screen name, just about every variation on my name had been taken. I setteld on RusselCrag (yes, I missed a letter). Even then I was thinking of home.

I did a little bit of a web search about Russell Crag. Aside from finding a guide service where a guide had claimed to have done first ascents there, there was nothing about climbing. Good. But there was some references to Peregrine falcons. Numerous cliffs in the Sierra’s have part time climbing bans to protect the Raptors that nest on them. The mother birds will often abandon a nest if she feels threatened. If this happens after the eggs are laid, they will not hatch, and another year with no replacement population threatens their already dwindling numbers.

In mid July, a few days after arriving on the East Coast, I took a pair of binoculars and scanned Russell Crag from my folks property. I got lucky. I saw a beautiful brown and white bird of prey launch from the vicinity of the crag, and start riding the rising wind currents west of Russell Mountain. The white band at the neck identified it as a Peregrine. I watched the falcon rise higher, pass after pass, and then disappear behind the mountain.

A few weeks later, I contacted Chris Martin the author of a New Hampshire Audubon study on Peregrin Falcons nesting in New Hampshire. He confirmed that Russell Crag was an active nesting site that year. They had bandded three chicks in June. By July, there was no risk of climbing to threaten the nest. He suspects that the nest will be in use for several years to come. In fact, he invited me along to help with the banding next may if I was interested. I most certainly am.

So if you are in the vicinity of Russell Mountain, search the skies for circling Falcons. If you want to climb Russell Crag, give me a shout and we’ll go up, so long as it isn’t nesting season.

Climbing at Quincy Quarries

One reason we moved to Boston was to be closer to the things we like to do. Yes, the Sierras are great, but at a minimum of 3 hours driving time from the SF Bay Area multiplied by the screaming infant factor, they were just too far away for regular visits.

This weekend was our only our second where we all stayed in the Boston area since we moved here in July. I made plans with some I met via meetup.com’s Boston Rock climbing meetup to climb at quincy quarries on Saturday morning. I had heard about the quarries back before I left the area (I left in 1989) but was not in to climbing then, so I had never made the effort to go. The stories back then were of car break-ins, falling rocks, and kids drownding in the water left in the old quarry holes. website offline I had been assured that the current scene was much more positive. I was pleased to find out that it was so. back link check . After some debate, my wife and I decided that it would be a decent attempt for a family outing, so we packed up the car and drove the 15 minutes south to Quncy.  We met up with Roger, my partner for the day, out on the street.  We both were running a little late, which made for a perfect connection.  The climbing was a one minute walk in on a paved trail.
While there is climbing that close to SF (Glen Park comes to mind) the quarries are a great site. The main area is a large grassy field with cliffs surrounding it.  One portion is quite overhung and makes a decent place to, say, put a stroller containing a sleeping toddler.  The cliffs are short, the tallest in this area was 50 feet.  But then again, that is still taller than even the highest point at most climbing gyms.  Add to that the fact that it is real rock and it makes for an enjoyable climbing experience.

We spent the day at  K wall.  I opened by leading outside corner, a 5.8 with great gear placements all the way up (Although I did clip a fixed piton). Once the rope was up, we pretty much shared ropes with the parties next to us on this climb and the 5.9 next to it.  At the end of the day, we move the rope over one more anchor and beat on what we thougt was a 5.9.  It was, except for the final move which was probably low 11s.  More than I was ready for at that point, even on TR.

The climbers were a great bunch.  Lots of people just getting into the sport that were experienceing “outside” for the first time, mixed with a few old school climbers that showed up solo and just got a ride on the existing topropes. One such old-school climber (Paul) showed a level of gracfulness in his layback approach to the crux move on outside corner, that we had all dyno-ed our way through.   I followed his example on my next attempt.

I managed to abrade the back of my hand on  a hand jam, so I call it a successful day.