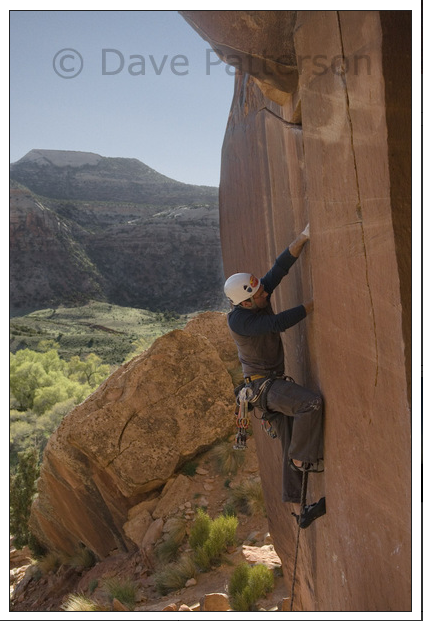
There are two main forms of rock climbing. The most popular is face climbing. The climber makes upward progress for the most by pulling downward on small ledges in the rock with their hands, and stepping on top of these same ledges with their feet. This is the predominant style of climb in climbing gyms as well as sport climbing. The other form of climbing involves cracks in the face of the rock. The techniques involved in navigating a vertical crack in a rock are somewhat different from the more popular face climbing.
I love crack climbing. A crack in the rock about two inches wide, just wide enough to get my hand inside, is thus called a hand crack. If a crack is in the face of a rock, with both sides of the crack flush, it is called a splitter crack. My ideal climb involves serious portions of perfect splitter hand crack.
A lot has been written about the placement of hands in hand crack. Less has been written about foot placement. Many people avoid crack climbing due to the painful nature of foot placement in cracks. I suspect I know the reason, and have a technique that will help both minimize the discomfort and maximize the effectiveness of foot placements.
The advice most people get when learning how to place feet is to cam the knee out perpendicular to the crack, so that the sole of the foot is vertical. You place the foot into the crack, and then turn the knee vertical, camming the foot inside the crack. The discomfort most people feet comes from the focus of pressure on the high point behind the big toe.

The diagram above is a simplified contour map of the foot. The curved paths represent spots on the top of the foot that are all the same height. The line segment AB represent the edge of the crack when the foot is placed parallel to the ground and perpendicular to the crack. Note how this line goes right over the arch behind the big toe. This is the pain point.
Proper foot placement in crack climbing is based around lining up the contour of the foot with the edge of the crack. The line Segment CD represents the edge of the crack in the preferred approach. Note how it aligns more closely with the major contour that runs along the outside edge of the foot, behind where the toes join. A typical climbing shoe, especially one designed for crack climbing, will have sticky rubber well up to this point. This sticky rubber is much more evenly in contact with the sides of the crack.
Here’s the technique. Rotate the knee out to the side so your foot is vertical. Place your vertical sole in the crack. You should just feel the edge of the crack on the pain point. You are going to use the pain point as the pivot point as you rotate the heel of the foot downward while you straighten your leg. Your foot will cam naturally into the crack, and the pressure will be distributed along the contour line of the top of the foot. As you rotate your foot, straighten your leg as well, and you should be able to place body weight on the newly placed foot.
Dave Patterson’s photo shows Joe Dawson with his left leg in the described position. (Yes, that is Indian Creek, home of some of the greatest splitter cracks you can imagine.) Note that he has his fully body weight on the lower leg, minus the small bit that is loaded on his arms. Note: Dave is a friend. I got explicit permission to use his photo. Please do not take it and use elsewhere.

Photo Copyright Dave Patterson, Used With Permission
